Introduction
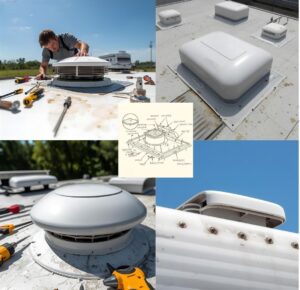
RV Roof Vent Cap Replacement: Your Go-To Guide. Tired of those pesky leaks in your RV? Noticed your roof vent cap is looking a bit shabby? You’re in the right spot! We’re going to chat about replacing your RV roof vent cap and why it matters. But first, let’s talk about keeping your RV in great shape.
Why Replace Your Roof Vent Cap?
Protect Your Investment
Your RV is more than just a ride; it’s like your second home! If you’ve put a lot of money into it, you probably want to keep it safe. A broken or worn-out roof vent cap can cause leaks, mold, and all sorts of costly issues. Think of it like your home’s roof—you wouldn’t let that go downhill, right?
Better Airflow
Did you know that a good roof vent cap can make a huge difference in airflow? Proper ventilation is key to keeping your RV comfy, especially during those hot summer days. By swapping out that old cap, you’re not just stopping leaks; you’re also making sure your RV stays nice and cool inside.
Signs You Need a New Roof Vent Cap
Visible Damage
One of the first signs you need a new roof vent cap is obvious damage. If you see cracks, chips, or weird discoloration, it’s time for a change. If it’s noticeable from the ground, it’s definitely time to upgrade!
Water Stains Inside
Seen any water stains on your ceiling or walls? That could mean your roof vent cap isn’t doing its job. Water leaks can mess things up big time, so you’ll want to tackle this pretty quickly.
Bad Smells
If you catch a whiff of something unpleasant in your RV, it might be time for a new vent cap. A damaged cap can let outside odors come in, which is definitely not fun when you’re trying to enjoy your space.
How to Replace Your RV Roof Vent Cap: A Simple Guide
What You’ll Need
Before we jump in, let’s grab our tools. Here’s what you’ll need:
– A new roof vent cap
– Screwdriver
– Caulk gun
– RV sealant
– Cleaning supplies
Step 1: Take Off the Old Cap
Start by unscrewing the old vent cap. Be careful not to mess up the area around it. Once those screws are out, gently lift the cap off—you might need to wiggle it a little to get it free.
Step 2: Clean Up
Now that the old cap is off, take a few minutes to clean the area well. Use a damp cloth to wipe away any dirt or debris. This is super important for a good seal when you put the new cap on.
Step 3: Install the New Cap
Time for the fun part! Put the new roof vent cap over the opening and secure it with screws. Make sure you follow the instructions that come with it for proper placement.
Step 4: Add the Sealant
To avoid future leaks, slather on plenty of RV sealant around the edges of the cap. This step is key to making sure that your new cap keeps out water.
Step 5: Final Check
Once the sealant dries, take a look at your work. Check for any gaps or spots that might need a little extra sealant. Better safe than sorry!
Conclusion
Replacing your RV roof vent cap might seem like a big job, but it’s super important for keeping your vehicle in good shape. By following these steps, you’ll make sure your RV stays a cozy and safe spot for all your trips. Remember, a bit of maintenance goes a long way to protect your investment!
So, are you ready to get that vent cap replaced? Don’t let a small issue snowball into a bigger problem. Get out there and keep your RV looking great!
Leave a Reply